But, alas, I then recall that before I can even open a packet of one of the sixty eight varieties of vegetable seeds I have in the planting queue, there’s work to be done. Though it sometimes feels like the veggies need little help from me to grow and thrive, I’m keenly aware of the fact that a well prepared planting bed means less work and frustration later in the gardening season, so I slap on a pair of gloves and grab my gardening fork, and out to the yard I march - determined to get through this little step in the gardening process so I can, well, get to the fun part.
In all honesty, prepping raised beds doesn’t have to be a big chore. It doesn’t take long and it isn’t complicated, but as we look forward a few months and imagine our gardens in the thick of the growing season, it can be difficult to stop, pause, and do some less than glamorous work. I assure you, however, that it’s worth it.
While indeed a simple task, there are a few different scenarios in which you may find yourself when it comes to garden prep time. Below, I’ve outlined the preparations necessary in each of those scenarios. If you find yourself in a situation not listed, please leave a comment and I’ll try to help you as best as I can.
Preparing New Raised Bed Boxes
If you’re starting a new garden and are building new raised bed boxes, you can simply fill those boxes with ⅔ fresh, weed-free soil and ⅓ organic compost. I’ve had great success with this ratio, and plan to use it for the new raised beds being added to my garden this year. Once your boxes are filled, you’re ready to plant. The soil will already be loose, so nothing further is required.
Preparing New Raised Beds Filled With Soil Only
If you’ve recently build new raised beds and have already filled them completely full of soil, but haven’t added any compost, you have a few choices. You can remove some of the soil and replace it with organic compost, or you can put a layer of compost a couple inches thick over the top of the soil and then mix it into the soil with a shovel or gardening fork. As with the scenario above, you don’t need to loosen the soil since it should already be loose.
Preparing Previously Used Raised Bed Boxes
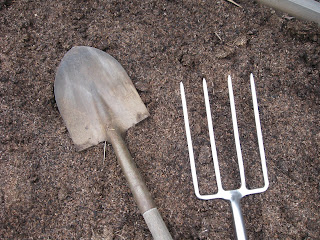
If you have boxes that you’ve grown plants in before, you’ll need to both add compost as well as loosen the soil. First, add a layer of organic compost a couple inches thick to the top of your planting bed. Then, if using a garden fork, loosen the soil by poking the tines of the fork down into the soil and then rocking the fork back and forth. Next, turn the top layer (the compost) into the soil with your fork. Some debate the need for turning the compost under, but personally I like for my compost to be mixed in well.
If using a shovel, you can “double-dig” the bed by first removing a 12-18” wide row (a short row, not a long row) of soil from your bed (put it in a wheelbarrow or other large container and save it for later in the process) approximately 18-24” deep, or to the depth at which the soil becomes notably harder. Loosen up the hard soil at the bottom of your trench with a gardening fork or claw style cultivator and add an inch or so of compost while you’re at it. Then, move on to the next row, but instead of putting the soil you remove into a container, use it to fill the first trench that you dug. Once the trench is filled, add a one inch layer of compost to the top and mix it in (or you can do this at the very end after double digging your entire box. When you get to the final row, use the soil you saved from digging out the first row to fill your last trench.
You can see why many gardeners prefer to use a gardening fork to loosen the soil rather than double digging, which is fairly labor intensive. Double digging does loosen the soil deep down, but experienced gardeners debate as to whether or not this is necessary. It is certainly necessary to loosen the soil to some extent, but I’m moving more towards using the gardening fork for the sake of ease. That said, even if you do choose to use a gardening fork to loosen most of your beds, you may still want to double dig the carrot beds to create soil that is loose to a greater depth, in order to allow plenty of room for those finicky roots. Carrots tend to grow strangely or develop forked roots in soil that isn’t loose enough (though Parisienne carrots, a favorite of mine, which are round rather than long and skinny, might do just fine!).
 |
| Pointed shovel and gardening fork. |
In addition to the preparations mentioned above, be sure to pull any weeds in pre-existing beds (don’t turn them under or they may re-grow), and be sure to add irrigation to ensure that your plants will get water even if you go out of town or just get tired of having to water each morning. Keep in mind, however, that while drip irrigation is fantastic for established vegetable plants, freshly planted seeds will generally do best when given plenty of consistent water via hand watering until they’ve sprouted and are well established.
Once your beds are prepared, you’re ready to plant your seeds, sit back, and watch your edibles emerge. Happy planting!


No comments:
Post a Comment